
posts in category Recipe • show all posts

Viennese Fingers Recipe
Monday, February 08, 2021
RecipeSometimes, I buy something from the shop that's really, really good and when I look into how it's made it's somehow only using ingredients I already have? That kind of recipe is particularly useful during Lockdown when my only food shop is a Saturday and if I don't get what I need in that lot, then it's another week till my next chance.
Viennese Fingers are a bit like these. I love Fox's ones you find in supermarkets but there's always an underlying artificial taste to shop-bought stuff. Which makes these ones I baked better, they're melty, simple and taste very homemade!
75g icing sugar
250g plain flour
1tsp vanilla extract
50g cornflour
150g dark chocolate
Let me know if you make Viennese Fingers and how they were!


Ingredients
250g soft butter (I used salted which was fine, but unsalted would've been better)75g icing sugar
250g plain flour
1tsp vanilla extract
50g cornflour
150g dark chocolate
Step 1:
Firstly, sieve all your dry ingredients together in a bowl, and mix in the butter and vanilla until you have a fully combined, thick mixture. You may have to use your hands at the end. If you're feeling strong and brave and your dough isn't too stiff then you can now pipe your biscuits with a star nozzle. If, however, you're a weakling like me then I would highly recommend simply moulding your biscuits into biscuit-like shapes and placing them on a greased baking tray.Step 2:
Bake in the oven at about 175 degrees for 12 - 17 minutes or until golden and stiff. I put mine in for about 16 altogether, but it really depends on your oven.Step 3:
Allow your biscuits to cool and move onto melting your chocolate in a bowl over simmering water. Once your biscuits have cooled, dip each into the chocolate, and place onto a tray lined with greaseproof paper. I always do this, and I also grease the paper beforehand.Step 4:
Leave your biscuits in the fridge for an hour or two to set.Let me know if you make Viennese Fingers and how they were!

Chocolate Orange Cake Recipe
Friday, January 22, 2021
RecipeChocolate Orange Cake
I've come across far too many people in this world who claim to dislike chocolate orange. Terry's Chocolate Oranges, the chocolate orange quality street, chocolate orange cookies, you name it and they hate it.
All very bizarre, but it won't stop me baking with my favourite flavours.. one of the things being this chocolate orange cake! It's very easy and looks amazing with the chocolate orange segments on top. Please let me know if you've given it a go!
Cake Mixture
Adapted from Mary Berry's recipe200g butter
4 eggs
200g caster sugar
200g flour
60g cocoa powder
6 tbsp boiling water
1 tsp vanilla essence
Chocolate Orange Ganache
150g dark chocolateZest of an orange
150ml double cream
Step 1:
Preheat oven to 180C or 160C for a fan oven.Step 2:
Mix the butter, eggs, flour, vanilla essence and sugar in a large mixing bowl until combined.Step 3:
Add your cocoa powder to the boiling water and mix until a smooth paste is formed, then add this to the mixture.
Step 4:
Pour into two sandwich cake tins and bake in the oven for 25-30 minutes.Step 5:
Make the ganache by heating up your cream to almost boiling and then pour over the chocolate chunks. Stir until all the chocolate has melted and combined. You can use it for the middle of the cake as well, or do what I did and mix up a quick buttercream with more orange zest, butter and icing sugar.


Coffee Macarons Recipe
Saturday, May 09, 2020
RecipeThese miniature treats are classy, elegant and dainty. They make a great dinner party dessert, you can be adventurous with your colours and flavours and once you get the hang of them they’re much simpler to make than you’d imagine. Their lightness screams temptation, so you may find yourself and your taste testers going overboard with these.
Ingredients:
- 4 egg whites
- 75g caster sugar
- 225g icing sugar
- 115g ground almonds
- 1 tbsp instant coffee (for macarons)
- 1 tbsp instant coffee (for filling)
- a pinch of salt
- 150g dark chocolate
- 125ml double/whipping cream
Equipment:
- Electric whisk
- Large mixing bowl
- Spatula
- Baking sheet
- Piping bag/pastry bag
- Round Icing nozzle
Step 1:
Preheat your oven to 150 Celsius. Carefully separate your egg whites into one large mixing bowl, add the caster sugar and whisk with an electric mixer/whisk until stiff peaks form. You should be able to tip the bowl upside down without the mixture moving at all.
Tip: Be patient, it could take as long as 10 minutes for stiff peaks to form but do not over whisk.
Tip: Be patient, it could take as long as 10 minutes for stiff peaks to form but do not over whisk.
Step 2:
Sift the icing sugar, ground almonds, one tablespoon of instant coffee and a pinch of salt into a separate bowl. Do this twice (or pulse in a food processor), and make sure that there are absolutely no clumps or your mixture will not be smooth enough.
Tip: Don’t be tempted to go overboard with mixing. If your mixture consistency is too smooth, then your macarons will flatten.
Step 3:
Carefully and gently fold your dry ingredients into the egg whites and sugar mixture until everything is fully combined. This should take approximately 40 folds and the mixture should be almost smooth.Tip: Don’t be tempted to go overboard with mixing. If your mixture consistency is too smooth, then your macarons will flatten.
Step 4:
Line two baking sheets with non-stick paper. Then, using a piping bag and a round nozzle, pipe circles onto the tray. Once complete, firmly rap your baking tray on a hard surface a few times. Place into the oven at 150 Celsius for approximately 20-25 minutes. They should come off the tray easily when ready, and you should leave them to cool on a cooling rack.
Tip: Place your piping bag inside a tall drinking glass and roll the edges over as this will make spooning the mixture into it easier.
Tip: If your macarons end up cracked, you haven’t rapped them on the table firmly enough, or you haven’t rapped them enough times.
Good luck, and remember that practice makes perfect!
Tip: Place your piping bag inside a tall drinking glass and roll the edges over as this will make spooning the mixture into it easier.
Tip: If your macarons end up cracked, you haven’t rapped them on the table firmly enough, or you haven’t rapped them enough times.
Step 5:
Break your chocolate up into small pieces and leave in a small bowl. Heat your cream in a saucepan and once boiling, stir in your remaining tablespoon of instant coffee and pour over your chocolate. Stir until the mixture has thickened and all the chocolate has melted. If the mixture is too runny then you will need to leave it to stand until it thickens. Once finished, spoon as much ganache as you like onto half your macaron shells and sandwich other halves on top. Be careful not to squash them!Good luck, and remember that practice makes perfect!

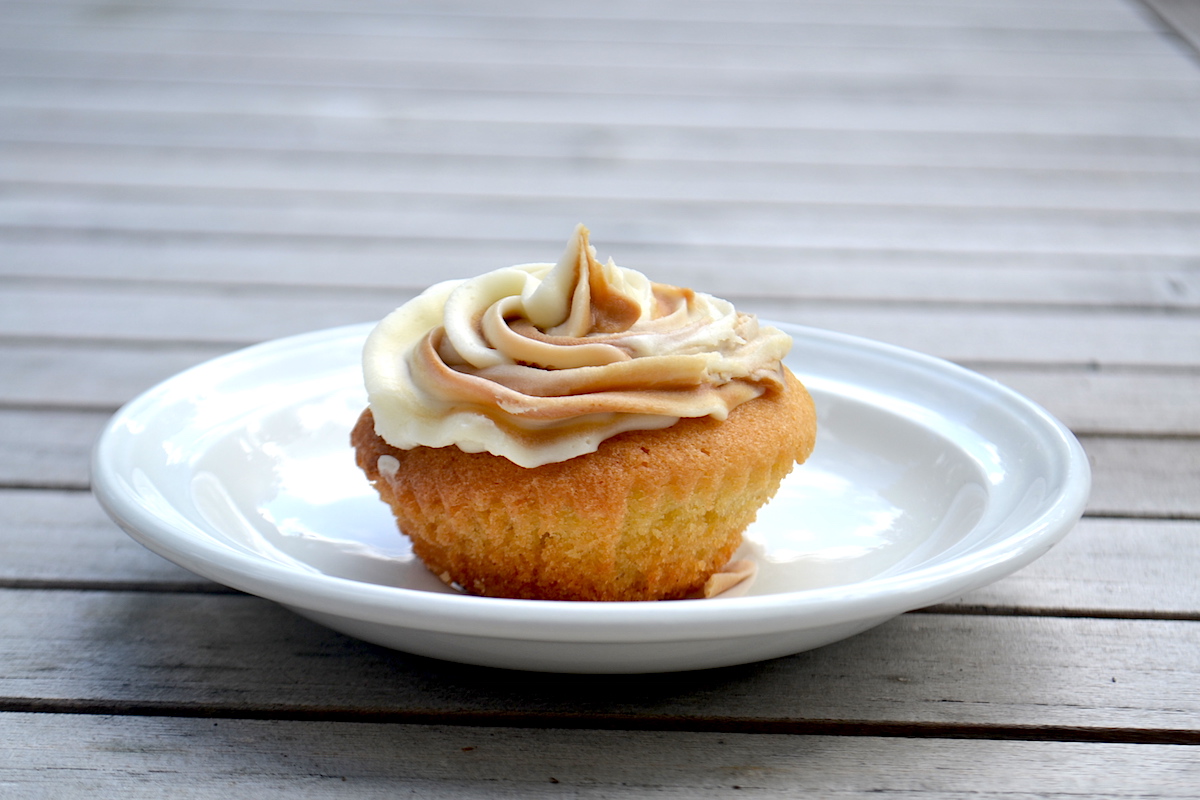
Speculoos Cupcakes Recipe

For those of you thinking 'what the heck is Speculoos?!', it's a delicious biscuit spread that tastes somewhere between gingerbread and digestives and it is heaven. Some people even have it straight on toast (not me, that's too far.) It was super popular in France when I lived there but seems to be more readily available in the UK now.
This recipe uses a base of vanilla cupcake with a Speculoos surprise in the middle, along with a fancy piped buttercream. The fun speculoos/vanilla combination in the buttercream is the trickiest part to master but even that only requires a piping bag, the right nozzle and a little bit of precision.
150g butter
150g caster sugar
150g self-raising flour
1 tsp baking powder
3 eggs
1 tsp vanilla essence
Speculoos/Biscoff spread
Ingredients
Cupcakes
150g butter
150g caster sugar
150g self-raising flour
1 tsp baking powder
3 eggs
1 tsp vanilla essence
Speculoos/Biscoff spread
Buttercream
125g butter
250g icing sugar
a few tsp water
Step 1:
Cream the butter and sugar together.
Step 2:
Beat in the eggs and the vanilla essence.
Step 3:
Stir in the sifted flour, baking powder, and a pinch of salt.
Step 4:
Fill one third of your cupcakes cases with cake mixture. Add a dollop of speculoos spread in the centre and cover with more mixture.
Step 5:
Bake in a preheated oven at 180c for 10-15 minutes or until a skewer comes out clean.
Step 6:
Beat your butter in a bowl and add the sifted icing sugar. Mix until combined and smooth, adding drops of water as and when needed.
Step 7:
Add streaks of speculoos spread to the inside of your piping bag, followed by the icing mixture. Using a large star nozzle, decorate your completely cooled cupcakes.


Chocolate and Raspberry Cake Recipe
Either way, the chocolate cake coupled with a cream and raspberries filling makes for a very delicious occasion cake. Or, it could be a non-occasion cake? You could just make it for the sake of making it, which is what I usually do.
The method is pretty straight-forward so I wouldn't say you need baking superpowers for this one - just give it a go and see how it turns out!

Ingredients:
200g sugar
200g butter
3 eggs
200g self-raising flour
75g cocoa powder
2tsp baking powder
150ml milk
250ml (approximately) double cream
150g dark chocolate
225ml double cream
raspberries
200g butter
3 eggs
200g self-raising flour
75g cocoa powder
2tsp baking powder
150ml milk
250ml (approximately) double cream
150g dark chocolate
225ml double cream
raspberries
Method:
Step 1:
Cream the butter and sugar together for a while, then gradually but thoroughly beat each egg into the mixture.Step 2:
Sift the flour, cocoa powder and baking powder together in one bowl, then gradually stir into your wet ingredients.Step 3:
Once combined, add small quantities of milk until the mixture is a dropping consistency (ie. it easily drops off your spoon).
Step 4:
Pour the mixture into two sandwich tins and bake in a preheated oven at 170 degrees (fan oven) for 25-35minutes. It really depends on your oven so keep on checking once you've hit the 25-minute mark. The cakes should be springy to touch and a skewer should come out clean.
Step 5:
For the topping, whip your 250ml of cream and layer onto one of the cooled down halves of cake, along with half your raspberries. Break your chocolate into a bowl and bring the other 225ml cream to the boil. As soon as it starts bubbling, pour the cream over the chocolate and leave to stand for 5 minutes, stirring every now and then so that it thickens. Once it's a thick consistency, use a spatula to cover the top of your cake and add the rest of the raspberries.
Let me know if you try this recipe out!
Let me know if you try this recipe out!

Subscribe to:
Posts (Atom)

Social Media